System Requirements
Hideload is currently available for Windows & Linux with MacOS builds comming soon.
-
Windows:
Only 64-bit support. Windows 8 and above
-
Linux:
Debian 12 and above | Ubuntu 22 and above
-
MacOS:
Will be available for Intel and Apple Silicon soon
Changes in your system
Hideload installation makes changes to your system to ensure the application works smoothly and is easy
to use.
- Creates desktop shortcut for faster access.
- Adds registry entries to enable opening files with Hideload directly from the right-click menu.
- Sets program path to an environment variable for global access from any terminal or script.
- Creates a .hideload_data directory in the user's home folder to store all data.
- Windows: C:/Users/<username>/.hideload_data
- Linux & MacOS: /home/<username>/.hideload_data
Warning
Deleting the .hideload_data folder will result in permanent loss of version history and organizer
data.
Installation guide
Hideload can be installed either using a standalone installer or deployed through Microsoft Intune.
Updates are typically seamless and do not require uninstalling the previous version. In cases where an
update introduces breaking changes that do require removal of the existing version, Hideload will provide
a clear announcement in advance. Uninstalling the previous version of the application will not delete any
user data. All application data remains intact, allowing users to continue working without interruption or
loss of information after reinstalling.
Installing Hideload requires administrator permissions. Please note that the application does not display
a prompt to accept the license agreement during installation. By proceeding with the installation, you are
deemed to have read and agreed to the Hideload Terms and Conditions, available on the About page.
Steps for installation:
- Get the latest version of Hideload Community Edition or Hideload Corporate Edition.
- You can download Hideload Community Editon from the Downloads
Page.
- For Hideload Corporate Edition, please contact us at subscription@hideload.org. A private download link
will be provided once the sales process is complete.
- Run the installer. Choose installation location if you are willing to customize. Click Next or Install
to proceed.
- Wait for Installation to Complete. The installer will copy files and configure settings. This may take
a few seconds.
- Click Finish when the installation is complete. Launch the software from the Start Menu or desktop
shortcut.
First Launch
On your first launch, you will be prompted to select a document home folder. All the documents you
organize will go to this folder. This step cannot be skipped.
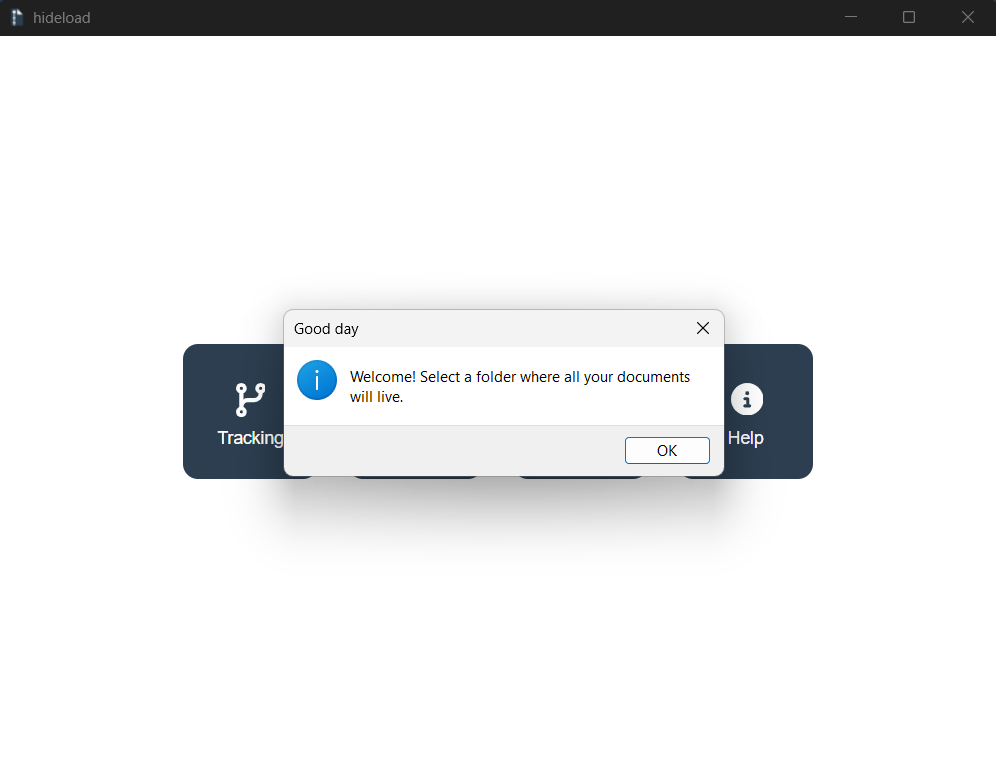
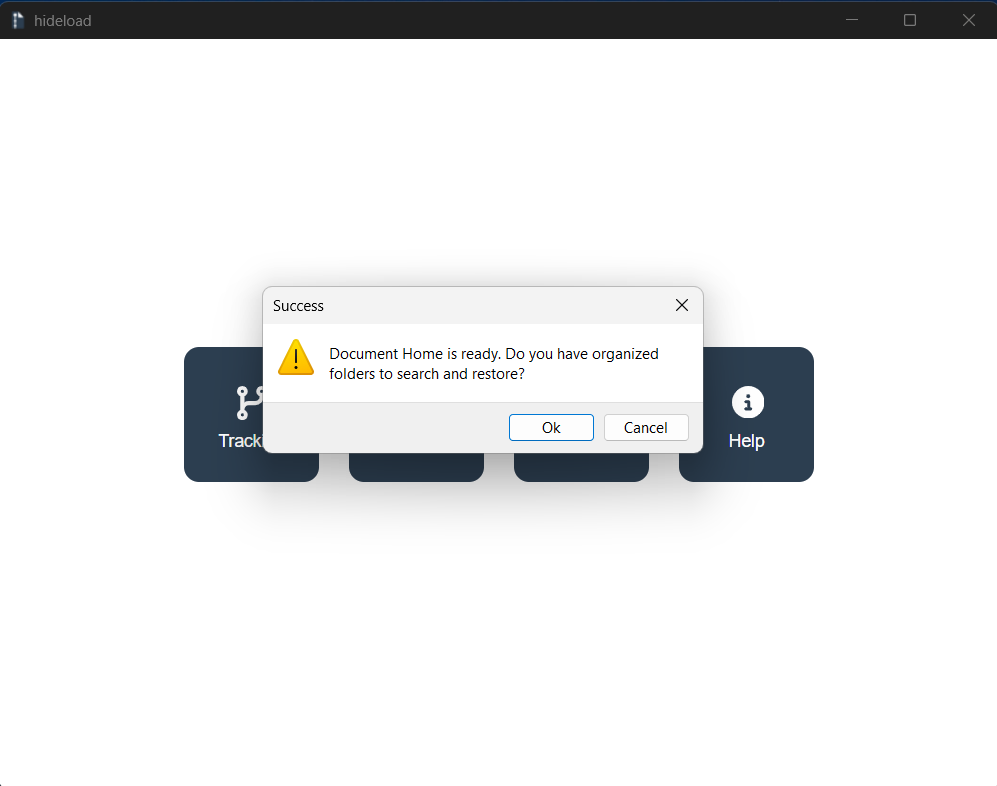
The first image displays the Welcome popup. After clicking OK, you'll be prompted to select a folder to
serve as your Document Home. Once the folder is selected, the interface will transition to a screen
resembling the second image.
On this screen:
- Clicking OK will initiate a search for previously organized fulders.
- Clicking Cancel will skip this step and proceed without scanning.
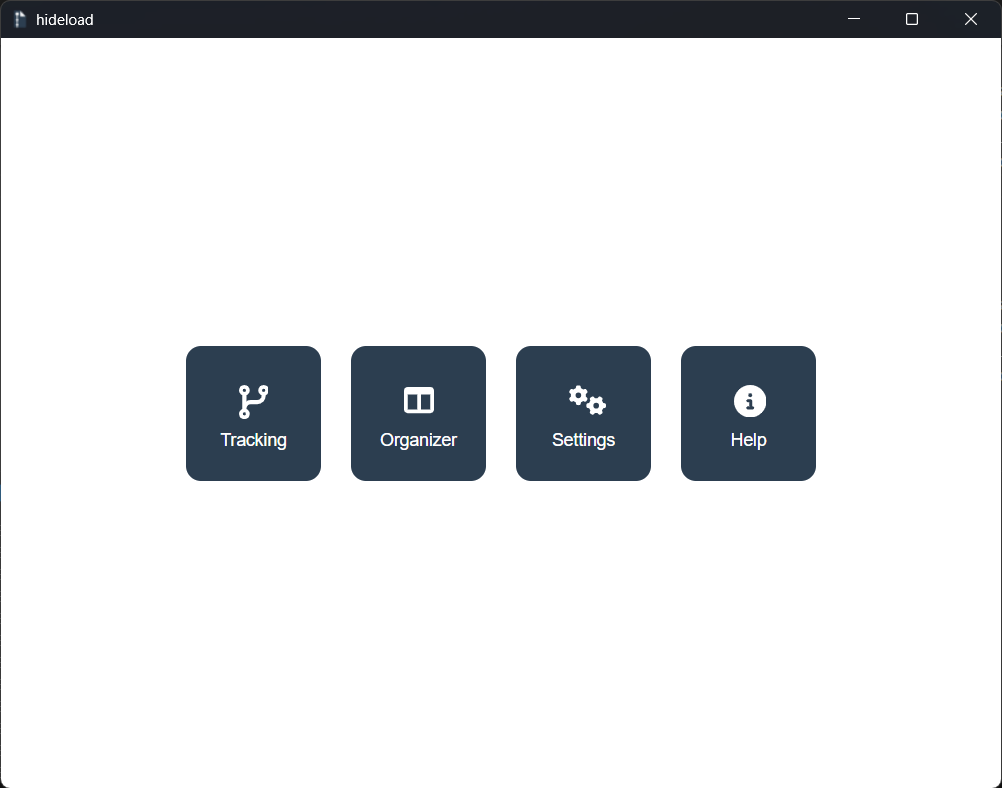
Explore the Main Menu
When you launch Hideload, a menu will appear with options to open either the Version
Tracking Applet or the Organizer Applet. These tools help you manage versions
and organize your documents efficiently. The menu also includes two additional options: Settings
and Help. Settings allows you to customize various application configurations. Help provides
details about the application version and contact information for support.
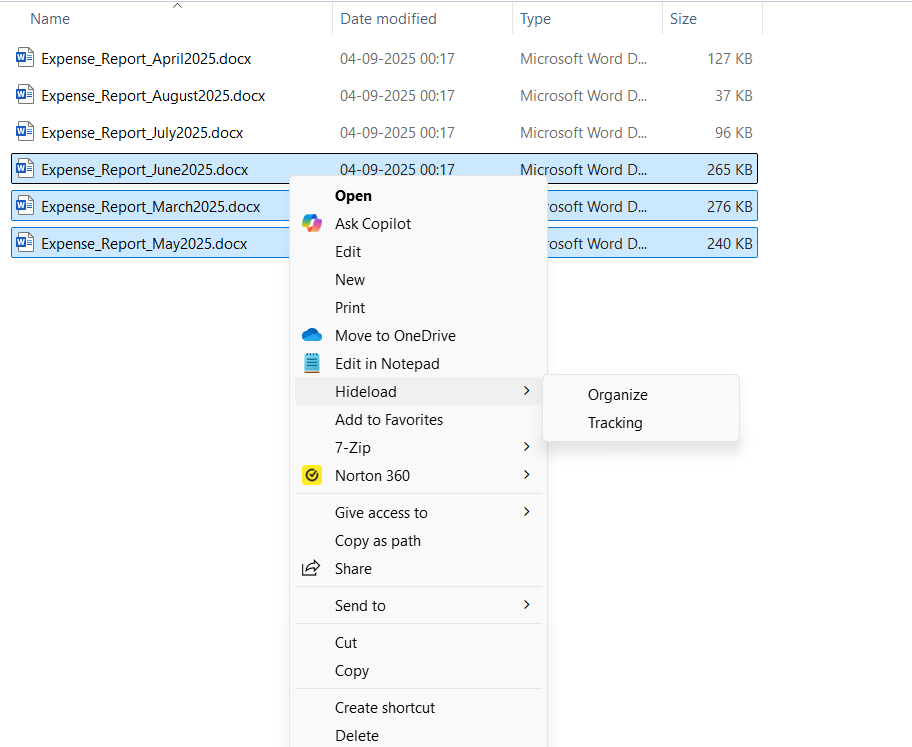
You can right-click on files to open the context menu and directly launch either the Version Tracking
Applet or the Organizer Applet for quick access.
Note
If you're using the Hideload Community Edition, the main menu will not be
displayed. Instead, the Version Tracking Applet will launch automatically upon startup.
Using Organizer
Organizer is exclusive to Hideload Corporate Edition, if you are using Hideload Community Edition, you
can skip this part.
Below topics will teach you how to use organizer.
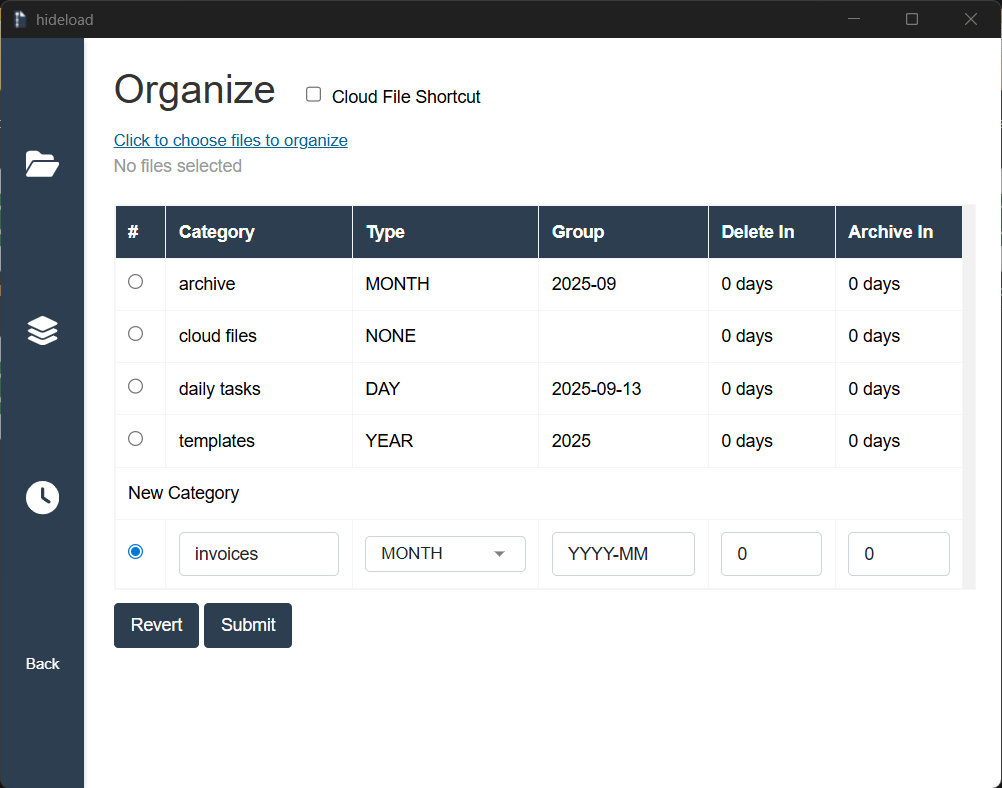
Create a new Category:
- In the Organize section of the Organizer applet, click Modify Category to add/edit categories.
- A form to add a new category will appear in the footer of the existing categories table.
- Enter valid values in the form. The Category Name is mandatory, and if you choose Named as the
grouping type, don't forget to specify a Group Name.
- To enable the Auto-Archive or Auto-Delete feature, set the counter to the number of days you want to
retain files in this category. The feature remains inactive if the value is set to 0.
- Optionally, select any files you'd like to assign to the new category, then click Submit to save and
organize them instantly.
Edit a Category:
- This workflow differs slightly from creating a new category. To edit an existing category, go to the
Organize section of the Organizer applet and click Modify Category.
- A form to add a new category will appear in the footer of the existing categories table.
- When you choose an existing category from the table, the form automatically enters edit mode. All
associated data will be pre-filled in the form, allowing you to make changes easily.
- Optionally, select any files you'd like to assign to the category, then click Submit to save and
organize them instantly.
Delete a Category:
- To delete an existing category, go to the Organize section of the Organizer applet and click Modify
Category.
- A form to add a new category will appear in the footer of the existing categories table.
- When you choose an existing category from the table, the form automatically enters edit mode. A Delete
button becomes visible in the top-left corner.
- Click the Delete button to remove the selected category.
- If the category is empty, it will be deleted immediately.
- If it contains files, those files will be auto-selected to be moved to another category.
After moving the files to a different category, click Delete again to complete the deletion.
- Clicking Delete not only removes the selected category, but also triggers a scan for other empty
categories, which will be deleted as part of the same action.
Organize files:
- In the Organize section of the Organizer applet, click "Click to choose files to organize" in the
top-left corner. Then, select the files you wish to organize—multiple selections are supported.
- Select the target category from the table of existing categories. Then click Submit to move all
selected files into the chosen category
- If you'd like to organize the selected files into a new category, click Modify Category, fill out the
form with the desired details, and submit to create and assign in one step.
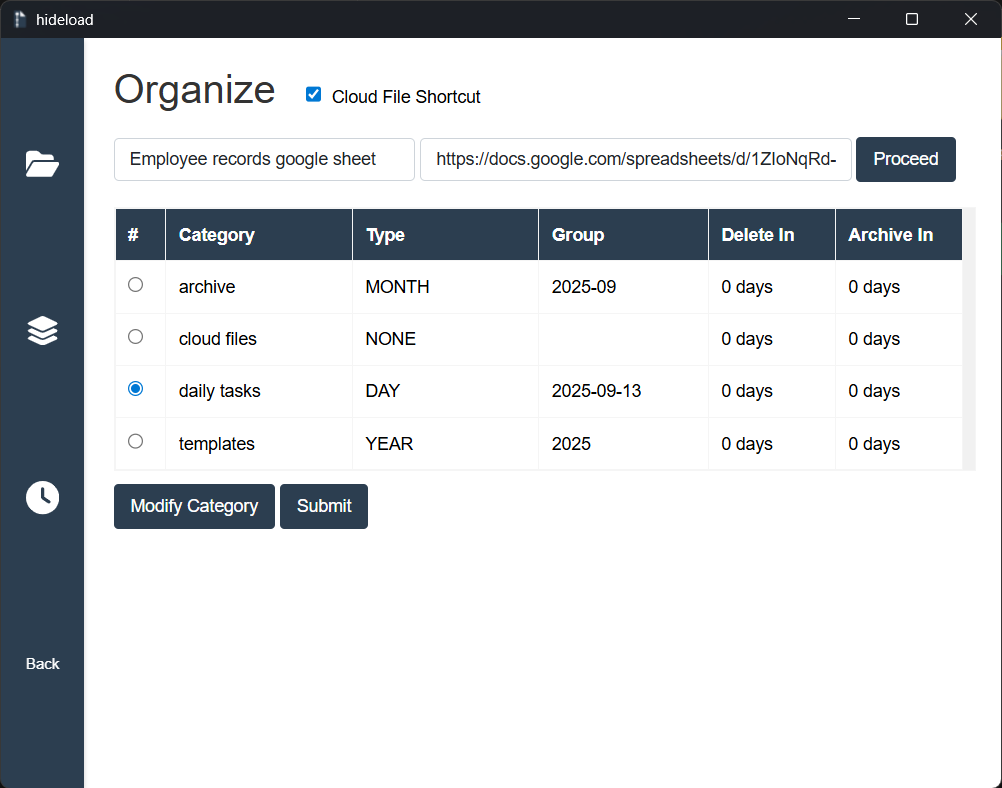
Cloud file shortcuts:
- To set up cloud file shortcuts, go to the Organize section and check the "Cloud File Shortcut" box in
the top-left corner. A dedicated form will appear for entering shortcut details.
- Fill in the shortcut name and cloud file URL, then click Proceed. The shortcut will be added to the
Cloud Files category automatically.
- The cloud file shortcut is also auto-selected, ready for relocation. Select an existing category and
click Submit to move out of Cloud files category.
Know About Hideload Explorer:
Use Hideload Explorer to quickly access your files without launching the traditional File Explorer. It
displays all files without requiring you to open folders and offers lightning-fast search capabilities.
You can also add descriptions to files, making it easy to understand their contents at a glance—no need to
open each file
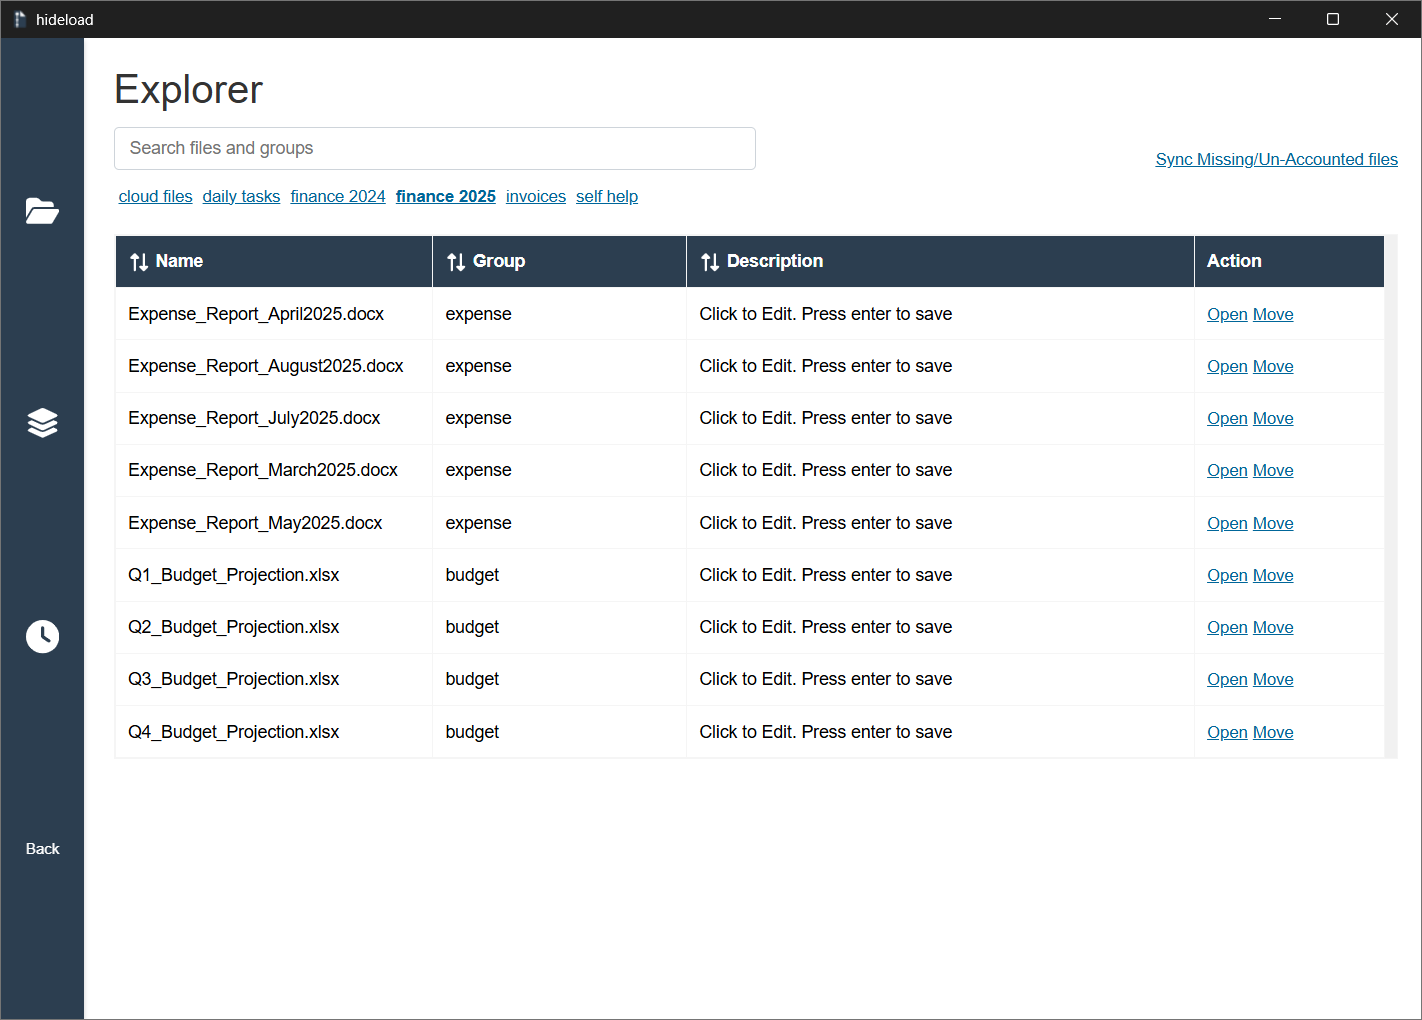
- Folder-Free Browsing: At the top of the screen, you'll see a list of all
existing categories. Click any category to instantly view its files in a sortable table format.
- Lightning-Fast Search:The search bar supports instant filtering across
all visible files in the active category. You can filter files by file name, description, or group.
- File Descriptions:To add a description, click the Description cell for
any file. This will reveal an editable input where you can enter meaningful notes or context for the
file.
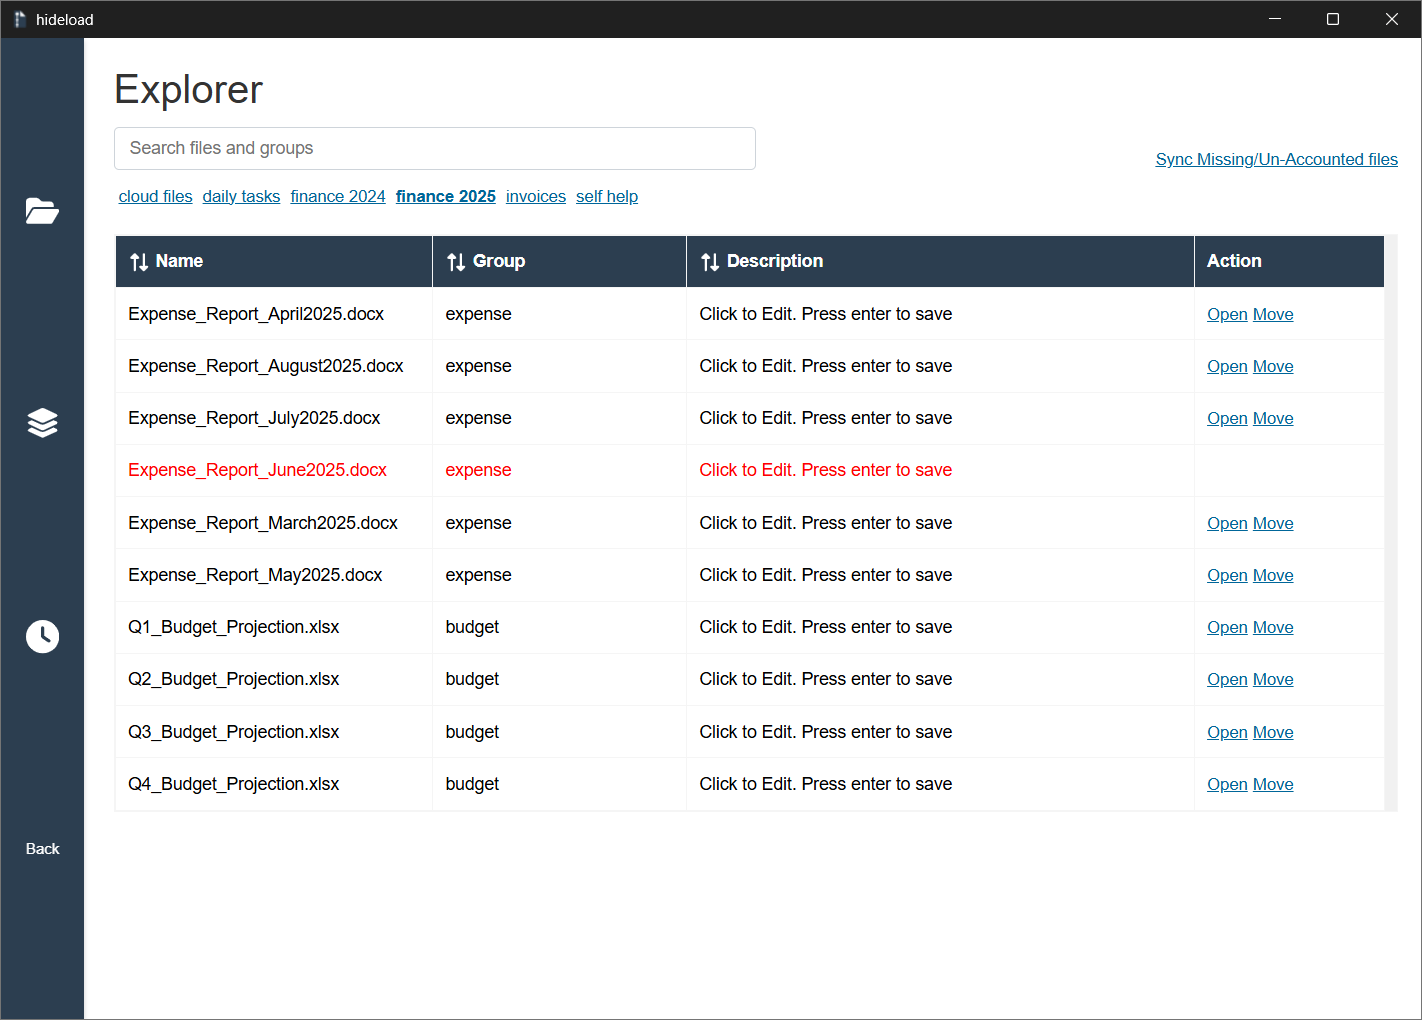
- Sync:If you've made changes to files outside of Hideload—such as moving,
renaming, or deleting—click Sync Missing/Unaccounted Files in the top-right corner. This action
refreshes Hideload's view to match the actual state of the filesystem.
Scheduled files:
Files in scheduled categories appear here once their retention period ends. They are not deleted or
archived automatically. To proceed, select the desired files and choose one of the available actions.
- Ignore now:Click to skip scheduled actions. We recommend periodic
cleanup to keep your desktop organized.
- Move selected:To retain specific files, select them from both the
Archive and Delete sections, then click this button.
- Execute Actions:Deletes or archives the selected files based on your
choices.
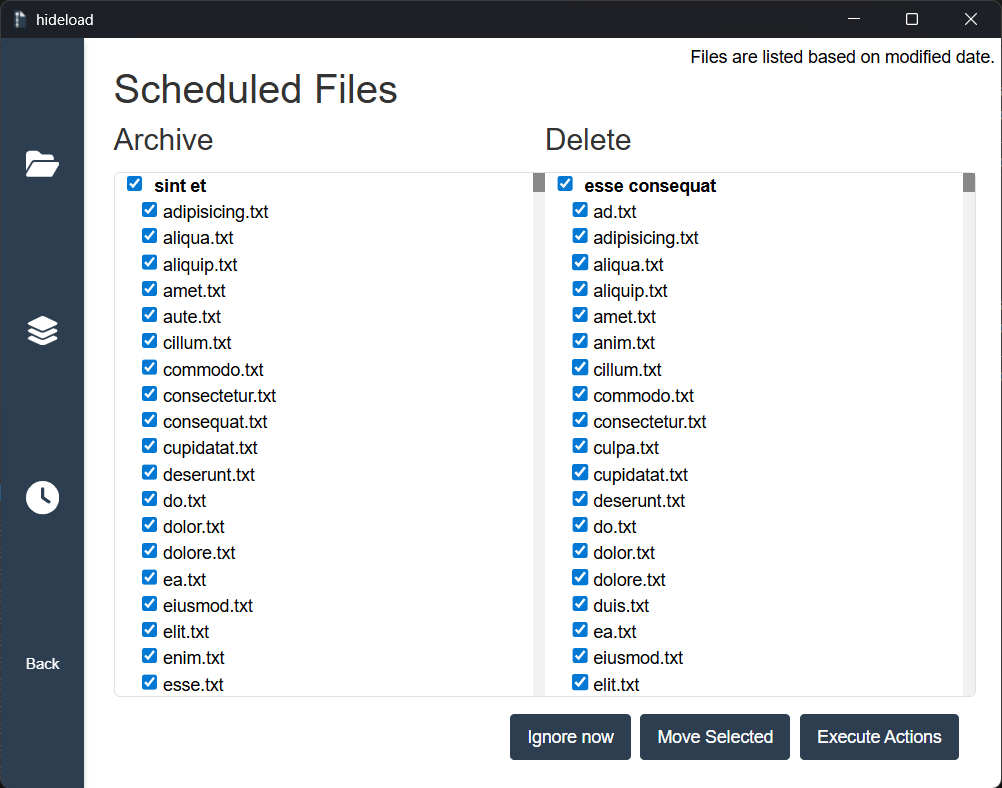
Warning
Files are listed by their last modified date. Please review carefully before deleting or archiving to
avoid losing important data.
Using Version Tracker
Use the version tracker to create snapshots of documents before editing. Add a unique comment to each
version to clearly identify the contents of each snapshot.
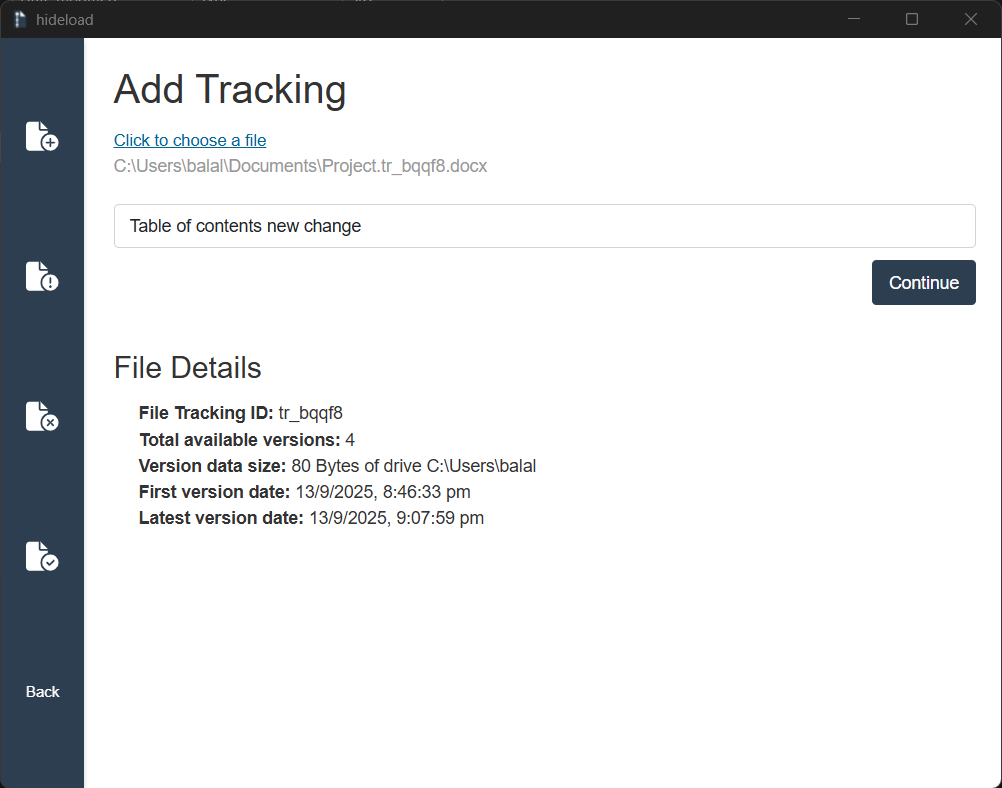
Add tracking:
Follow these steps to take a snapshot using the version tracker:
- Click "Click to choose a file" and select the file you want to snapshot.
- Enter a unique comment to identify the snapshot, then click Continue to proceed.
Note
This action renames the original file and appends a tracking ID, allowing Hideload to identify the
file regardless of its location.
Version tracking is not automatic—by design. Taking manual snapshots gives users full control over
when and why a version is saved.
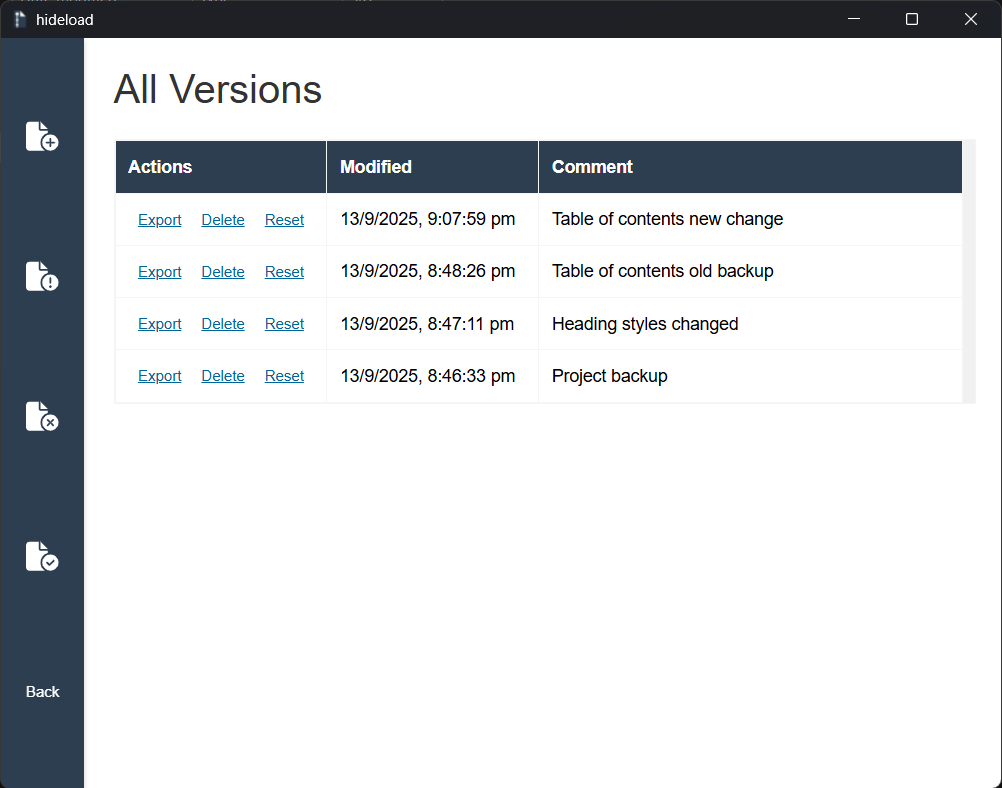
All versions:
All available snapshots of the document are displayed in a tabular format, along with their associated
comments. The following actions are available:
- Export:Exports the selected snapshot, it will be saved in the same
directory as the original file with the filename prefixed by "Export".
- Delete:Deletes the selected snapshot from the version history.
- Reset: Replaces the main file with the selected snapshot and deletes all
snapshots created after it.
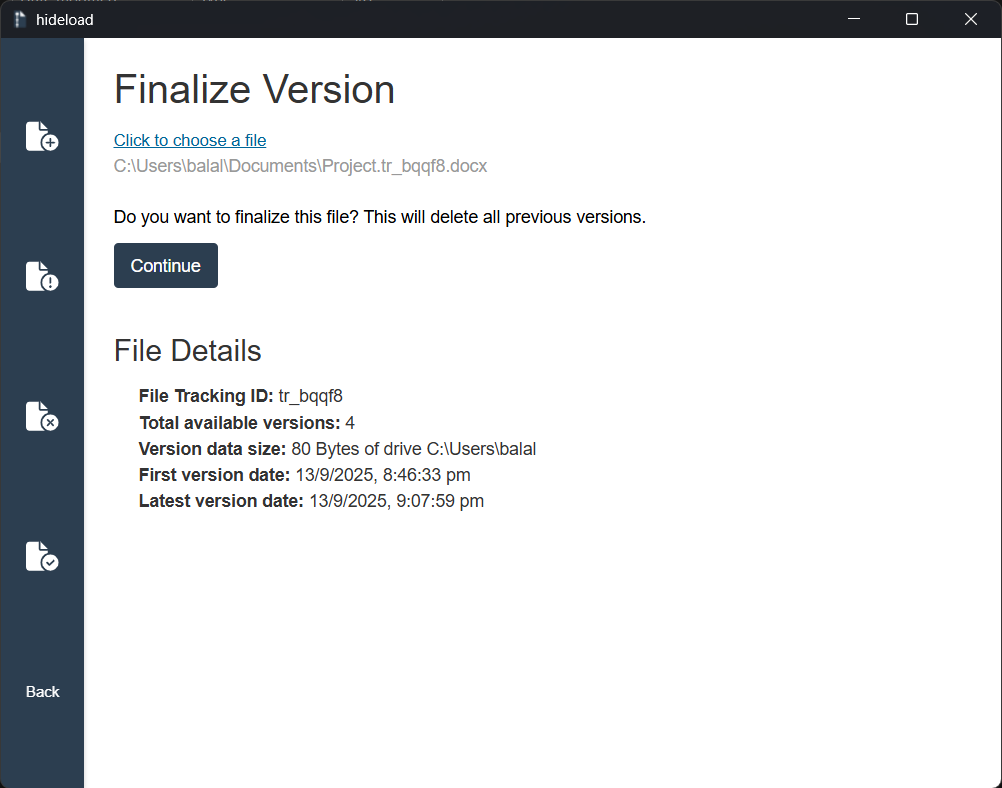
Finalize version:
This action removes all version snapshots associated with the document. The tracking ID in the filename
is replaced with "final" to indicate completion.
Unlink version:
Removes all version snapshots linked to the document. The tracking ID is stripped from the filename.
Reset Application
All customization and reset features for the application can be accessed through Settings.
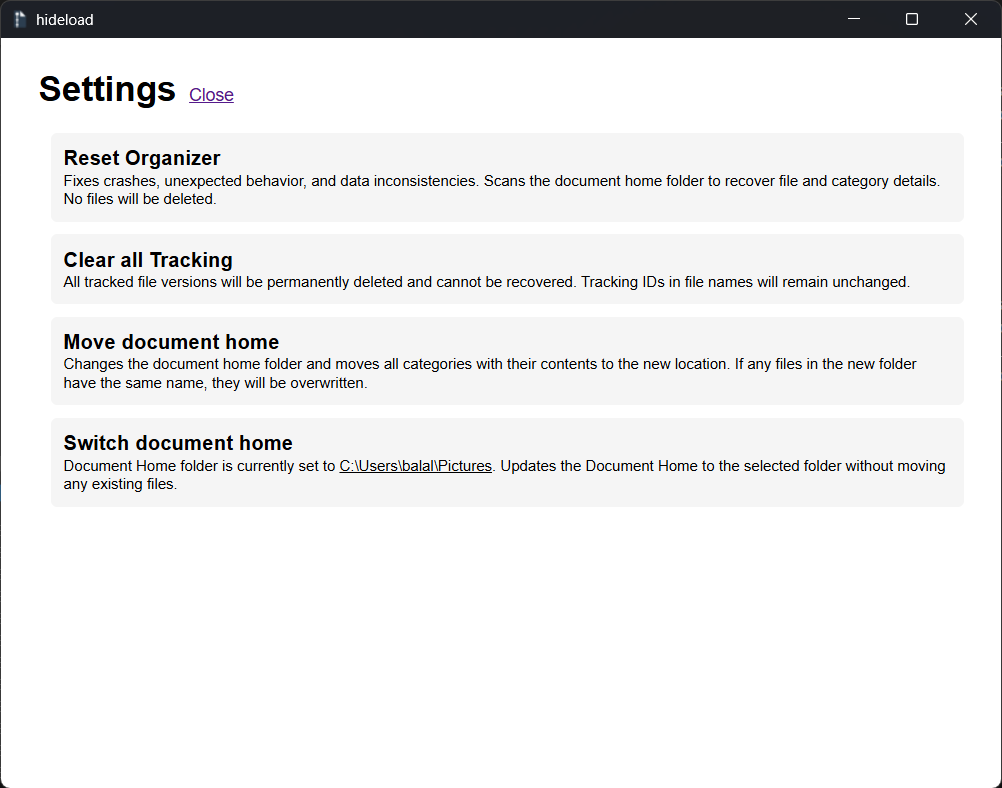
Reset Organizer:This option clears all file details and locations
previously known to Hideload, then performs a fresh scan of the Document Home. Use this if the application
behaves unexpectedly or shows inconsistent data. Note: File descriptions will not be preserved.
Clear Tracking: This option removes all existing document snapshots from
the system. Use with caution, as this action cannot be undone. It is recommended when you need to free up
storage space.
Move Document Home: Copies all organized files to a specified location.
Only files known to Hideload are included in the transfer; existing files in the original directory are
retained for user review. Verify that all files have been copied to the new location. After confirmation,
you may delete the original folder to free up space.
Switch Document Home: Updates the Document Home to a new location. All
newly organized files will be stored in this updated directory. Note: Existing files will not be
moved to the new directory.
Access Denied
This is the most common issue users encounter while using Hideload. Below are the most frequent causes:
Reason #1 - Special Folders:
Windows Defender's Controlled Folder Access feature, enabled by default on many systems, prevents
unauthorized applications from performing file operations—such as move, rename, or delete—within certain
user profile folders. This protection is designed to block ransomware and other malicious software from
tampering with personal data.
The commonly protected folders include:
- C:\Users\NAME\Desktop
- C:\Users\NAME\Documents
- C:\Users\NAME\Downloads
- C:\Users\NAME\Music
- C:\Users\NAME\Pictures
- C:\Users\NAME\Videos
If you are using any of these folders as your document home, we recommend creating a subfolder inside one
of them (e.g., C:\Users\NAME\Documents\Hideload) and setting that as your document home. This avoids
permission blocks while maintaining user familiarity.
Refer to How to switch document home for step-by-step instructions.
Reason #2 - Insufficient Permissions:
This error occurs when Hideload attempts to access or modify a file or folder without the necessary
privileges. Common causes are as below:
-
The target file/folder might require administrative rights.
- The target file/folder is owned by another user or system account.
- NTFS permissions restrict access to the required directory.
To verify this, copy the file or folder to a different location—preferably a user-accessible path and
retry the operation using Hideload on the copied item.
Reason #3 - Antivirus or Security Software Interference:
Some antivirus or protection tools may block Hideload's operations—especially during file movement,
renaming, or deletion—if the software is not recognized as trusted. This is a common safeguard against
ransomware and unauthorized file manipulation.
Recommended Fixes:
- Add Hideload as a trusted app under Windows Defender's Controlled Folder Access.
- Check quarantine logs to see if Hideload has been flagged or blocked in your antivirus. If yes,
whitelist hideload by following antivirus section
Reason #4 - File or Folder Is in Use:
This error occurs when Hideload attempts to access, move, rename, or delete a file that is currently open
or locked by another process. Even if the file appears closed, background applications or system services
may still be holding it.
Recommended Fixes:
- Close All Applications that might be using the file.
- Close file explorer that has the containing folder open. It may hold a handle on the file—especially
if thumbnails or previews are enabled.
- Temporarily pause cloud sync activities if safe to do so.
- Temporarily pause Antivirus if safe to do so.
- Restart Your System to release stuck handles.
Reason #5 - System Integrity Protection:User Account Control (UAC) is a
Windows security feature that prevents unauthorized changes to the system. Even if a user is part of the
Administrators group, UAC runs most applications with standard privileges by default, unless explicitly
elevated.
Avoid using Files located in system-protected folders like:
- C:\Program Files
- C:\Windows
- %SystemRoot%\System32
Path does not exist
This error occurs when Hideload attempts to access a file or folder using a path that is invalid,
mistyped, or no longer available. If Hideload reports that a file is missing, but the file still exists at
the expected location, it may be referencing an outdated or invalid path internally.
What to do:
- Retry the operation by manually selecting the file again within Hideload
- If the issue persists, restart the application to refresh its internal state and try again.
No Space Left on Device
This error occurs when the target drive or partition has insufficient free space to complete the
requested operation—whether it's saving a file, extracting an archive, or installing a component.
Common causes are:
- Low Disk Space on the system or target drive.
- Temporary Files or Cache Bloat consuming hidden space.
- Large Pending Updates or restore points occupying reserved storage.
- Cloud Sync Services storing offline copies of files
Move the document home to a location with sufficient free space—preferably on a local drive to fix this
issue.
File Already Exists
This error occurs when Hideload attempts to create, move, or rename a file to a location where a file
with the same name already exists.
How Hideload Handles It:
Licensing
Is Hideload free to use?
The Community Edition is free for personal use. The Corporate Edition requires a valid license.
What type of license does Hideload use?
Hideload Corporate Edition uses a per-site license, meaning each license is valid for a single physical
or virtual location.
Is the license time-bound?
Yes. Licenses are issued for a fixed duration — either 6 months or 1 year.
Purchasing & Activation
How do I obtain a Corporate license?
You can request a license by contacting subscription@hideload.org. Please include your organization
name and intended use.
Can I upgrade from Community to Corporate?
Yes, you can upgrade at any time. But, as of version 1.2.0, your version data from community edition is
not compatible with corporate edition.
Can I renew or extend my license?
Yes. You'll receive a renewal reminder 15 days before expiration. Licenses can be extended for another 6
or 12 months.
Can I transfer my license to another site?
Licenses are site-specific and non-transferable. A new license is required for each location. - If you're relocating your current site, the existing license remains valid until the next renewal date — after which you'll need to obtain a new license for the new location.
How is the license activated?
After the sale is finalized, Hideload sends you a private download link via email. This link gives you access to the licensed software.
Whenever a new version is released, you'll receive an email notification with a new private download link for the latest version.
The license is tied to the site where it's installed and remains valid until the next renewal period.
Logs and Reporting
Where can I find application logs?
Application logs are typically stored in the User Home Directory. Look for a folder named .hideload_data.
Inside this folder, navigate to the logs subdirectory. There, you'll find
- action.log — Tracks user actions and file operations
- system.log — Records system-level events and application status
These files contain the most recent log entries and are useful for troubleshooting or monitoring activity.
How to report an issue?
Hideload does not automatically collect error data from failures. If you encounter a problem, please
describe it in detail and send an email to one of the following addresses:
Note
We only respond to emails sent from verified corporate domains at corporate.support@hideload.org.
If applicable, please include relevant log files (action.log, system.log) from your .hideload_data/logs
folder to help us diagnose the issue more efficiently.